Set up the machine
A walking foot (also sold as an even-feed foot) has its own set of feed teeth that grip the top layer while the machine's feed dogs grip the backing. Without it, the presser foot drags the top layer forward and you get a pleat or a drift at the end of every line. Walking feet are made for specific machines and shank heights, so buy the one your machine's manual lists or one that names your model.
- Stitch length: about 3 mm, a little longer than piecing length. Most walking-foot quilters work between 2.5 and 3.5 mm. Shorter stitches look busy and are hard to unpick; longer ones look like basting.
- Needle: a new 80/12 or 90/14 quilting or topstitch needle.
- Thread: the same weight top and bobbin to start with, 40 or 50 weight cotton or polyester. A thread that blends with the top hides wobbles; a contrasting one shows the lines off and shows every mistake too.
- Space: set the machine level with the table if you can, or push a second table against its left side. A quilt hanging off the table pulls on the needle, and the line bends.
Sew a test line on a scrap sandwich made of the same fabric and batting before starting. Adjust the top tension until neither thread shows dots of the other color.
Choose the spacing
First, the batting decides the widest spacing allowed. The package gives a maximum distance between lines of quilting; Warm & Natural cotton batting, for example, is sold as able to be quilted up to 10 inches apart. Go wider than the package says and the batting can shift and bunch inside the quilt after a few washes. See the batting guide for how the common types compare.
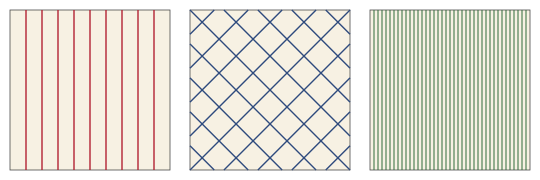
Within that limit, spacing changes the feel. Lines 2 to 3 inches apart leave a quilt soft and drapey, which is what you want on a bed or a baby quilt. Lines an inch apart make it flatter and firmer. Matchstick quilting, at ¼ inch or closer, turns the quilt into something nearer to canvas, which works on wall hangings and table runners and less well on a quilt someone sleeps under.
Density also costs thread. On a 50 × 60 inch quilt with lines running the 60-inch length, lines 1 inch apart come to 49 lines and about 82 yards of top thread. At ¼ inch apart it's 199 lines and about 332 yards, plus the same again in the bobbin. Wind several bobbins before you start.
Mark or guide the lines
You only need to mark some of the lines. The rest can follow a guide.
- Seam lines: stitch in the ditch (right in the seam) or ¼ inch beside it with the edge of the walking foot as a guide. No marking at all.
- Painter's tape: lay a strip of ¼-inch or 1-inch tape and sew along its edge, then move it. Peel it off the same day; adhesive left on for days can leave residue.
- A hera marker: a plastic blade that creases the fabric without ink. The crease shows best on solids.
- Water-soluble or heat-erasable pens: test on a scrap of each fabric first. Heat-erasable ink can come back in the cold, and some marks set if ironed.
- The walking foot's guide bar: a metal arm that slides into the foot and rides along the previous line. Set it to your spacing and you only ever mark the first line.
Stitching order
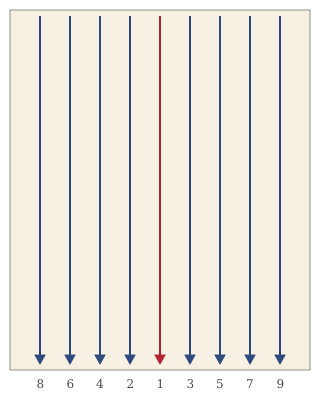
- Start with a line down the middle of the quilt. Any fullness then gets pushed toward the edges, where it has somewhere to go, instead of being trapped in the center.
- Sew the next line on one side of center, then one on the other side, and keep alternating outward.
- Sew every line in the same direction, top to bottom. Sewing back and forth makes the layers creep diagonally in opposite directions on alternate lines, which shows up as ripples. It means turning the quilt around after each line.
- Roll the half of the quilt that goes under the machine's arm tightly, and fold or drape the other half over your shoulder or a table. Support the weight so the machine isn't pulling it.
On a large quilt, quilt a grid of anchor lines first: a few lines across both directions, say every 10 inches, to stabilize the whole quilt. Then fill in between. You can remove the basting pins from each section as it's anchored.
Starting and stopping
Backstitching makes a visible knot of thread. Two neater options:
- Micro stitches: set the stitch length to about 1 mm, sew the first ¼ inch, then switch to your full length. Do the same at the end. The tiny stitches lock the thread and almost disappear.
- Tie and bury: leave 4-inch tails at each end, pull the top thread through to the back, tie the two together, then thread both into a self-threading needle and run them into the batting for an inch before clipping. It's slower but invisible, and it's the best choice where a line stops in the middle of the quilt.
Lines that run off the edge of the quilt into the batting margin don't need to be secured at all; the binding holds them.
Crosshatch
A crosshatch is two sets of parallel lines that cross, usually on the 45-degree diagonal, making diamonds or squares. Mark one diagonal line from corner to corner with the 45-degree line of a long ruler. Sew it, then sew the parallel lines with the guide bar, working out from that first line in both directions. Mark the opposite diagonal and repeat. Check the angle of the second set before sewing it: if the first lines drifted, the diamonds will turn to lozenges, and it's easier to remark than to unpick. The second set crosses quilting that's already done, so the layers are well anchored; most of the shifting happens on the first set.
Matchstick quilting
Matchstick lines are parallel lines ¼ inch apart or closer, usually done after a wider set of lines has anchored the quilt. Sew lines 1 to 2 inches apart first, then fill in between them, using the edge of the walking foot or a marked line on it as a guide. Expect the quilt to shrink a little in the direction across the lines as all that thread pulls it in, so square it up after quilting, not before. It's slow (count on the yardages above) but very forgiving; small wobbles disappear among so many lines.
Common mistakes and fixes
| Problem | Cause | Fix |
|---|---|---|
| Pleat or tuck in the backing | Backing not taut when basted, or not enough pins | Unpick that line, re-pin the area, quilt from the center out |
| Lines ripple or wave | Lines sewn in alternating directions | Turn the quilt so every line runs the same way |
| Top layer pushed into a bubble at the end of a line | No walking foot, or the walking foot not engaged | Fit the walking foot; check its arm sits on the needle clamp screw |
| Lines curve on the edges | Quilt weight dragging off the table | Support the quilt so it lies level with the machine bed |
| Bobbin thread dots on top | Top tension too tight | Lower the top tension a step, retest on a scrap sandwich |
Before quilting, the layers need to be basted. When you're ready for curves, move on to free-motion quilting, or quilt one block at a time with quilt as you go. After quilting, square up the quilt and bind it. The whole sequence is in how to make a quilt.
You might also like
 Echo and feather quiltingEcho lines around shapes, and feathers by hand and machine: spines, plumes, the bump-back method and common fixes.
 Free-motion quilting for beginnersMachine setup, practice sandwiches and three first motifs, including the meander or stipple.
 Applique methods comparedFusible raw-edge, needle-turn, freezer paper, back-basting and machine applique stitches, with a table of when to use each.
 Quilt binding variationsFlange and piped binding, machine binding done well, bias binding for curves and scallops, prairie points and facings.